If your organization uses Single Sign-On (SSO), you won’t be able to edit your name or email address from Account Settings. Those fields are managed by your identity provider — contact your IT or admin team to update them.
Profile photo and contact info
Personalizes shared CMAs and auction contact cards.
Default map locations
Powers your weekly digest and centers the map on your area.
Secondary email
For enterprise accounts with multiple brands.
Adding Your Profile Photo and Contact Info
Your profile photo and contact information populate any CMA you create and share, and they appear on your contact card when you share a farm sale. Filling these in gives the materials you send out a personal, branded touch.1
Open Account Settings
Log in to CamoAg and click Account Settings.
2
Upload a profile photo
Under My Account, click Edit to the right of Profile Photo and upload your image. If necessary, drag or adjust the outline to crop the area you want displayed, then click Save.
3
Add your contact info
Scroll down to General Information and click Edit. Enter the contact details you want to appear on shared materials, then click Save.
Setting Default Map Locations
Available to all CamoAg users.
- You’ll receive a weekly email digest of upcoming auctions in your area. (If there are no upcoming auctions, no email is sent.)
- If your organization sends sales data to CamoAg, any new sales will also be included in the digest.
- Default locations help the platform surface the most relevant farms and data for your area.
- Your default location acts as the map center when you log in.
1
Open Account Settings
Click Account Settings.
2
Find Default Locations
Under My Account, scroll down to Default Locations and click Add/Edit.
3
Select a state and county
Choose a State and County from the dropdowns.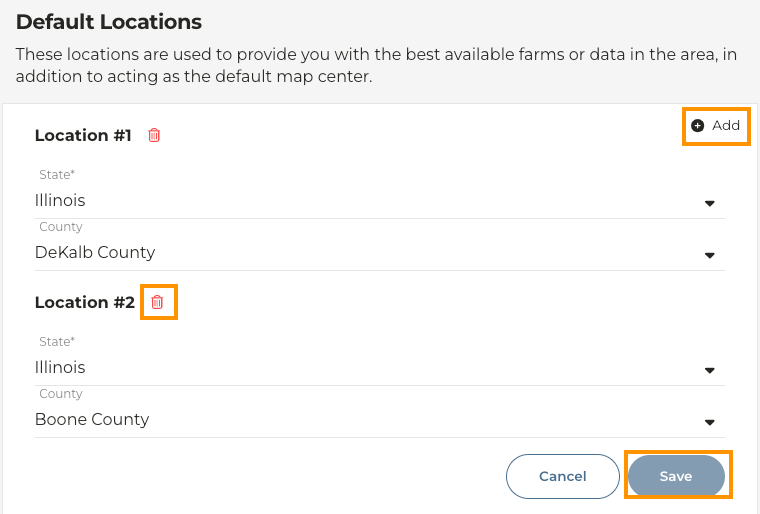
4
Add more or save
To add additional locations, click Add. To remove a location, click the trash can icon next to it. When you’re done, click Save.
Adding a Secondary Email
Available only for enterprise accounts with multi-branding.
1
Open Account Settings
Navigate to Account Settings.
2
Add a secondary email
Under My Account, click Add next to Secondary Email.
3
Enter the email
Enter the email associated with the other brand.
This email must be associated with the other brand — it cannot be a personal email.
4
Verify the email
A verification email will be sent. Click the link in that email to complete setup.
5
Switch branding when sharing
Once verified, you’ll be able to choose which email and branding to display when sharing a CMA or auction.